Growing Herbs in Colorado
Winter in Colorado might seem like a challenging time for gardening, but growing herbs indoors can be a rewarding way to enjoy fresh flavors year-round and here’s howto successfully cultivate your indoor herb garden during the colder months.
Select the Right Herbs: Certain herbs thrive better indoors than others. Consider growing:
-Basil: Prefers warm temperatures and plenty of light; -Thyme: A hardy herb that adapts well to indoor conditions; -Parsley: Tolerates lower light but grows best in moderate sunlight; -Chives: Easy to grow and can tolerate some neglect.
Pot size and soil: Choose pots that are at least 4-6 inches deep, ensuring they have drainage holes to prevent water retention. Use a high-quality potting mix that retains moisture while allowing good drainage.
Light requirements: Light is critical for indoor herbs. Ideally, place your pots in a south-facing window where they will receive 6-8 hours of sunlight daily. If nat-ural light is insufficient, consider using grow lights. Position about 6-12 inches above the plants and provide 12-16 hours of light daily to mimic natural condi-tions.
Watering: Check the top inch of soil; water only when it feels dry. Make sure your pots have proper drainage to avoid overwatering, which can lead to root rot.
Temperature and Humidity: Keep your indoor herbs in a consistent tempera-ture range of 65°F to 75°F. Avoid placing them near drafts, heating vents, or cold windows. Indoor air can be dry during the winter, so consider using a humidity tray or small humidifier to maintain humidity levels, especially moisture-loving herbs like basil.
Pest Control: Regularly inspect your plants. If you find pests, wash the leaves with water or use insecticidal soap.
Fertilizing Your Herbs: Herbs generally need less fertilizer during the winter months. A liquid fertilizer every 4-6 weeks can promote growth. Avoid over-fertilizing as this can lead to weak or leggy plants.
Harvesting: One of the joys of growing herbs indoors is the ability to harvest fresh leaves throughout the winter. Regularly snip off leaves to encourage growth but avoid cutting more than one-third of the plant at a time to keep it healthy.
Growing herbs indoors during the winter in Colorado is not only feasible but can also enhance your culinary experiences. By considering their light, watering, and care needs, you can enjoy a flourishing indoor herb garden, even in the coldest months.
Michael Morris 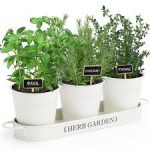
Bulb Planting Lasagna Style – Michael Morris
What is it? An approach designed to optimize available space, while maximizing spring bloom display. This is accomplished by layering bulbs in a container or garden bed, so different varieties emerge in sequence for an extended spring display.
Why do it. It maximizes vertical space, lets early small bulbs fade while later larger bulbs rise, and produces continuous color from early spring through late spring.
How to do it. Layer by bloom time and size. Use small, early bulbs on top (crocus, grape hyacinth), medium mid-season bulbs in the middle (hyacinth, mid-season tulips, daffodils), and the largest, latest bloomers at the bottom (late tulips, allium).
Fit a higher count of small, shallow bulbs near the top and use fewer, larger deep bulbs below, so each bulb has enough soil and root space to develop without crowding or starving the others. Use a deep container with good drainage holes and start with a 2–3-inch base of well-draining potting soil.
Layering recipe. Add 2” to 3” inch soil layer, place largest bulbs pointy-side up, cover with 2” to 3” inches of soil, place mid-size bulbs, cover again, then place small/early bulbs near the top and finish with a final soil layer so the top bulbs are covered.
Positioning and spacing. Place bulbs close but not touching; leave a half- to one-inch gap between large bulbs and tighter spacing for small bulbs to create a full look.
Watering and overwinter care. Water thoroughly after planting, keep containers outdoors or chilled through winter to satisfy cold requirements.
Soil Preparation. For in-ground flower bulb layering. Because you will have many more bulbs growing and using the same resources, it is important that you prepare the soil by incorporating organic amendments such as compost and peat moss, with the existing soil. Also work in bone meal or Dutch Bulb Food to ensure the nutrition level of the soil can support so much blooming. 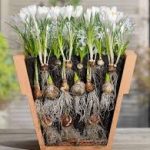
Spring-flowering bulbs typically need 12 to 16 weeks of chilling at temperatures around 40°F (4°C) to bloom successfully. This chilling period mimics the natural cold dormancy they’d experience in the ground during winter.
To chill spring bulbs in outdoor lasagna-style pots, place them in a protected, cold spot where temperatures stay between 35–45°F (1.5–7°C) for 12–16 weeks. To avoid damage by freeze-thaw extremes, place pots against a north-facing wall, wrap pots in burlap, bubble wrap, or place inside larger containers filled with mulch or straw. An unheated garage or cold frame will also work.
Tips to Boost Your Tomato Harvest This Fall – Michael Morris
At this point in the season, it’s important to direct the plant’s energy towards ripening existing fruit, as opposed to growing stems and leaves, flowering and producing new fruit.
This can be accomplished by pruning strategically, adjusting the watering schedule, stopping fertilization, and by providing protection on cool nights.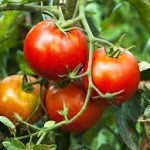
Start by pruning dead, diseased or damaged stems and leaves. Pinch off new flowers and remove any tomatoes that are soft to the touch or showing signs of disease.
Root pruning will also encourage ripening. To root prune, simply stick a shovel or trowel six to eight inches deep into the ground, all the way around the edge of your tomato plant. This will chop off the ends of the roots and encour-age the plant to divert its energy into ripening the fruit.
Cut back on the watering. Less water helps to con-centrate the sugar in the fruit, hastening the ripen-ing process and producing a more flavorful crop. Start by slowly reducing the amount as well as the frequency of watering. The goal is to slow the plant’s growth, without letting it dry out to the point of wilting.
Stop fertilizing. With the bulk of the crop already on the vine, it’s time to stop fertilizing.
Protect your plants at night by covering them with an insulating material. Tomatoes need more than 60° F to ripen properly. With nighttime temperatures drop-ping into the fifties, keeping your plants warm will help fruit ripening.
Things to Do in the August Garden by Michael Morris
Just like every other month, August brings its own set of opportunities to the garden, including harvesting, watering, weeding and preparing your garden for the change in seasons. Whether you’re growing in containers, raised beds or in ground, a well-maintained garden yields better results and makes the transition into fall easier.
August is typically the month when all your hard work comes to fruition. Tomatoes, peppers, cucumbers, zucchini, beans, and other garden favorites are starting to ripen now, so keeping up with harvesting is especially important. Harvesting regularly not only lets you enjoy your produce at its peak but also encourages plants to keep producing.
When you pick ripe fruits, vegetables, or herbs, it tells the plant that it needs to produce more. Harvesting at the right time also ensures better taste, texture, and nutritional value and prevents crops from going to seed, which prolongs their productive phase. 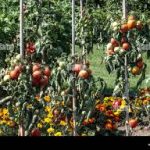
While you’re harvesting, take a hard look at your tomatoes and vegetables. Removing dead and diseased leaves on your tomato plants will put more energy into fruit production. Recognize common tomato problems such as blossom end rot (use Ready-To-Use Fertilome Yield Booster or concentrated Cal-Mag to increase calcium levels) cracking (be consistent with watering).
Heat, wind, uneven watering, poor soil, over fertilizing, insect damage can also cause tomato leaves to curl and twist. The best thing to do at this point is to work in your garden every day, maintain an even watering schedule and keep using an organic fertilizer every two weeks.
This is also the time to start planning for a second crop of cool weather vegetables. Beans, radishes, lettuce, kale, spinach and many more cool weather crops can be planted soon, for late season harvest. Prepare the planting site by removing any spent foliage left over from summer’s crops. Next, work two to three inches of compost and worm castings into the top six inches of the planting site. Rake the bed and you’re ready to plant. Fall crops can be planted from seeds or plant starts or a combination of the two.
If you’re not planning a fall crop, consider planting a cover crop, such as oats or winter rye. A cover crop will help improve soil structure, soil fertility and protect the living portion of your soil, including micro-organisms. Irrigate, don’t water. Conserving water is always  important, so whether you water with a hose or a drip system, it’s important to water at the ground level not overhead. By positioning the drip system emitter or hose end sprayer where it’s needed, you’ll optimize plant water consumption and reduce water waste due to evaporation.
Get in the habit of carrying a pair of light pruners with you as you make your rounds. As you spot a blossom beginning to fade snip it off. In gardening terms it’s called deadheading, which simply means pruning off the old flowers. This keeps the garden neat and promotes additional blooms on perennials such as Hardy Hibiscus, and Butterfly Bushes.
Do the same for your container plants, including hanging baskets. Fertilize your baskets and containers every two weeks with ferti-lome 20-20-20.
Check your roses and remove any spent blossoms. Mid-August is the time to feed your roses for the season. Water each rose bush, then apply the fertilizer and water thoroughly.
Keep an eye out for summer weeds. They take advantage of cultivated garden soil to grow vigorously and can produce several generations during the summer season. It’s important to control them before they seed out.
Powdery mildew may be seen on squash, pumpkins as well as peonies and other ornamentals. Organic fungicides such as Sulfur will help contain the spread. Once the season is over, it’s important to do thorough cleanup. Leaving spent vegetation in place will encourage mildew and other diseases to winter over and reinfect your garden next spring. 
Taking care of these issues as you find them is the best way of preventing bigger problems next season.
Keep a detailed record of your garden by starting a gardening journal. Note specifics like planting dates, varieties chosen, weather patterns, pest or disease problems, and how much you harvest from each crop. Throughout the season, take pictures to visually track plant growth and the overall progress of your garden.
Reviewing your notes and photos at the end of the season can make next year’s planning far more effective. For example, you’ll be able to remember which varieties gave the best yields, pinpoint spots that received ideal sunlight, and identify when pests or diseases first appeared so that you can implement preventative strategies or adjust planting times. With these insights, you can rotate crops more wisely, select plants better suited to your garden, and improve your harvest year after year. 
How to Care for your Garden when it’s Hot! 
Now’s the time to remember that a well-cared for garden depends on a well-cared for gardener. Gardening during hot weather can be challenging for you as well as your crops. As a gardener, self-care is always important, especially when temperatures soar. Some ways to accomplish this are by choosing lightweight, light-colored clothing, taking frequent breaks, and staying hydrated. Wearing sunscreen, sunglasses, and a hat, and tying a wet bandana around your neck also helps. In addition, break your chores down into small tasks 20 to 30 minutes long and work in the garden in the early morning, when it’s cooler.
As for your plants, here are some things you can do to help your garden thrive even during high heat. Make sure your plants get enough water. Water regularly and deeply, avoiding overhead watering. Water early in the morning and water each plant deeply to ensure they receive enough hydration. Extreme temperatures can impair their ability to take up water through their roots, so consistent watering is crucial. The ideal time to water is in the cool hours of the early morning. When you do water, avoid overhead sprinkling. Soak the soil at the base of the plant. This allows the water to penetrate deeply into the soil and reach the roots, giving your crops a proper drink before temperatures increase.
If early morning watering is not feasible, the next best option is to water in the late evening. Add mulch. Mulch improves moisture retention and helps keep the weeds down. Apply a layer of organic mulch around the base of your plants. Soil Pep is a good choice for your vegetable garden, because you can use it as a soil conditioner after the season is over. Keep it 2 to 3 inches thick and maintain a few inches of space between the mulch and base of the plant. This will create a moat effect for catching water.
Make your own shade. When it comes to extreme heat, the most important ob-servation is when and where the harsh afternoon sun hits the hardest. Tomatoes and other sun-loving plants will benefit from some late afternoon shade. Shade cloth or netting can help your  plants a lot in hot weather by protecting them from both the heat and the sun. For best re-sults, hang the netting several inches above your crops by using hoops or wooden frames. Shade cloth is easy to set up and remove, helping your plants stay cooler.
Make sure your plants get the right nutri-ents but avoid high nitrogen fertilizers. Tomatoes and vegetables need more phosphate for roots and blooms, not vegetation growth. Fertilize in the evening on well-hydrated plants. Instead, fertilize with organic fertilizers such as 5-7-3 or 5-8-4.
Keep the weeds under control. Weeds are competition for water and soil nutrients, so keeping them under control will help your garden plants absorb the most water and nutrients they can get from the soil.
Don’t forget your flowering plants growing in pots and hanging baskets. They’re going to need attention as temper-atures rise. Check them daily to see if they need to be watered. Nutrients are more transient in potted plants, especially hanging baskets, so plan to fertilize container plants every 12 to 14 days.
Michael Morris
How to Garden in Support of Pollinators
It’s important to realize that in addition to honeybees, bumblebees, native bees, butterflies, moths, flies and more also fill a role as pollinators in our landscapes and gardens. To attract the greatest diversity of pollinators, we need to supply a source of food, water, and shelter. 
The key to attracting and supporting pollinators is to offer plants that provide pollen and nectar through the season. This can be accomplished by includ-ing annuals and herbs in your garden, along with perennials and native plants.
Native plants include Columbine, Native Bee Balm, Rocky Mountain Penstemon and Sunset Hyssop. Perennials with good sources of nectar and pollen include Asters, Black-eyed Susan, Columbine, Coneflower, Digitalis, Gaillardia, Joe-pie Weed, Mums, Penstemon and Sedum.
 Annuals such as Sunflowers, Zinnias, Marigolds, Lantana, Petunias, and Salvia will help fill in any gaps in the seasonal bloom cycle. Pollinator-friendly shrubs in your garden include Blue Mist Spirea, Lilac, Rose of Sharon, Weigela and Butterfly Bushes.
Beyond perennials, annuals and flowering shrubs, think about incorporating herbs such as chives, basil, comfrey, mint and lavender amongst your tomato and vegetable crops.
Cover crops such as Crimson Clover attract pollinators and can dug into your garden to improve the soil once it stops flowering.
In the fall, plant spring blooming bulbs such as crocus, hyacinths and tulips to support early foraging pollinators. 
Planting in groups or clusters will bring a focus to your landscape and save pollinator’s energy searching for food.
Gardening with pollinators in mind should include accessible water. This could be a shallow pot saucer or a birdbath. Place some flat stones in the birdbath or saucer so pollinators will have a place to land and drink safely. Consider leaving a patch of the garden uncultivated for bumble bees that burrow. For wood and stem-nesting. 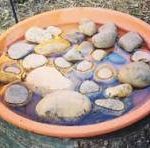
If you do not have a traditional garden space where you can plant directly in the ground, you can plant in containers and place them on your patio or deck. Select a few different kinds of plants of varying heights, colors and textures. Pollinators will find them.
Even a small pollinator garden will help support bees, butterflies and other pollinators. With some thought and planning, you can create a destination that pollinators will be attracted to. Michael Morris
Amending the Soil by Michael Morris
Now that you’ve done your soil tests, how do you turn your low organic, high clay soil into something you can really grow in? 
You supplement it with soil amendments. What is a soil amendment? Soil amendments are products which help add organic material to the soil. A good soil amendment will make your existing soil healthier and more fertile by improving the structure of the soil, which allows better, stronger root development. Stronger root systems mean healthier plants and better yields in your vegetable garden. Adding organic material also helps lower the soil ph. Soil pH is a measure of how “sweet” or “sour” our soils are. For most of us, our garden soils are alkaline (sweet) with high levels of ph. Plant production is optimized when grown in neutral or slightly acidic soils, because fertilizers and nutrients are more available when the soil pH is right.
When it comes to choosing soil amendments, it’s best to use Colorado-based products that are specifically designed to work in our clay-based soils.
This includes Earth Essentials Sheep, Peat and Compost which contains aged sheep manure, peat moss and compost, Cow and Compost, which consists of aged and screened dairy manure and Natures Yield Organic Compost which is EKO compost and sphagnum peat. If you’re growing in a raised bed, consider adding EKO Raised Bed mix. How many bags do you need? A bag of Sheep, peat and compost will cover 10 square feet, 2” deep.
Adding earthworm castings at this point will increase soil microbial activity and act as a mild fertilizer. A 30-pound bag will cover about 100 square feet, 1″ deep. Typically, you’ll want to add 1″ to 2″ of organic worm castings to your soil each season.
Take your bags home, open them up and put them in a pile. It’ll make it easier to mix all your ingredients together and will help break down surface tension, which reduces the resistance to water absorption.
So now we have this pile of amendments including a bag of Sheep, Peat and Compost and some earthworm castings and we’re going to dig it all in about 50:50 with our native soil. It’s important to include your native clay in the mix, because clay tends to be nutrients rich in calcium, potassium and magnesium. Amended clay also holds moisture well and doesn’t compact. Plan to amend your garden soil annually, spring and fall to keep it healthy and productive.
Soil Testing: How to test your garden soil by Michael Morris
Want to have a better, more productive garden this season? It all starts with a healthy soil? Now’s the time, before you start planting, to understand your soil, by testing two important elements: pH and structure. You can test your garden soil yourself and get reliable results. Here’s what you need:
A home soil test kit, such as Rapitest soil test kit
An empty Mason jar or peanut butter jar
A scoop for gathering soil
Garden gloves
Soil pH is a measure of the acidity or alkalinity of a soil. On the pH scale, 7.0 is neutral, above 7 is alkaline, below 7 is acidic. Most plants prefer a pH of between 6.5 and 7. Our soil is typically greater than 7. High pH locks out the nutrients that your plants need.
Rapitest offers a 10-test soil pH test kit. All you do is take a sample of soil, mix with water, transfer some of the solution to the color comparator, add powder from capsule, shake and watch the color develop. Then, note your test results. Fast, easy and it only takes a few minutes.
In addition to pH, the structure, physical makeup, and organic content of your soil has a direct impact on your garden’s productivity. Whether you’re growing in a raised bed or an in-ground one, the physical quality of the soil affects everything from strong root development to flower and fruit production.
The Jar Test is a quick, easy way to help you determine the structure and physical makeup of your soil. You’ll need a clean jar with a lid, in this case a peanut butter container. Put 4-5 ounces of soil in the bottom of the jar. Add enough water to fill the jar 2/3 full. Add a drop or two of dishwasher soap. Put the lid on and shake well, then let the jar sit undisturbed for 24 hours. You’ll see that the soil has settled into layers. The first layer will be sand. The second layer will be silt, followed by clay, suspended clay, then a small amount of organic material, floating at the top. 
To achieve a better ratio of organic material to clay, as well as balance soil pH, plan to add two to three inches of organic compost and coconut coir to your garden in the spring and again in the fall. Worm casting are also good choices for improving your garden soil.
Incorporating these products on a continuing basis will improve soil structure, lower pH as well as feed and diversify your soil microbiome.
If you’re looking for a more comprehensive evaluation of your soil, Colorado State University also offers soil testing. Follow this link to learn how take and submit a sample for analysis: https://agsci.colostate.edu/
A Timeline for Starting Seeds Indoors by Michael Morris
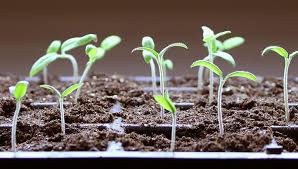
When it comes to starting seeds indoors in the spring, knowing when to start is one of the most important elements. Begin by understanding the hardiness zone you garden in. Sometimes called growing zones, USDA zone hardiness maps are based on winter temperature averages over a thirty-year period. The intent is to help gardeners make informed decisions regarding which plants will perform well in their geographical area. While primarily aimed at trees, shrubs, perennials, knowing your hardiness zone is useful for your vegetable garden as well. The 5 zones represented in Colorado are 3, 4, 5, 6, 7. The mountains are predominantly Zone 4, the fruit growing area near Grand Junction is 6-7and the Front Range predominantly Zone 4-5. Longmont Plant Hardiness Zone is 5b and Estes Park is Zone 5a.
In Longmont, a normal growing season is 146 days (about 5 months). This number assumes that season extenders such as frost cloths, cloches or cold frames are not used. As a rule, May 15 (May 30 if you garden at altitude) is the start of our frost-free growing season. That said, you should always be prepared to deal with the unpredictable spring weather _some years we have been able to plant as early as Mothers’ Day, other seasons its after Memorial Day. October 1st is the average first Fall frost.
Using May 15 and the information on the back of the seed packets you’ve selected will determine the day you’ll want to start your seeds indoors. Example: Peppers and tomatoes should be started eight to ten weeks before last spring frost. If you calculate ten weeks before May 15, seeds for these warm weather crops should be started the week of March 7.
Cool weather crops (lettuce, spinach, kale) and root crops (carrots, radishes, turnips) respond best to direct sowing in the garden. They typically don’t transplant well.
Begin the process by choosing high quality, fresh seeds from local suppliers. Check the back of the seed packet. There should be a 2025 date printed on it. This is your assurance that the seed is fresh. When you open the seed packet you should find seeds that are uniform in size and color. Selecting fresh, premium seeds will give you better germination rates and stronger seedlings, which ultimately leads to a better crop.
Take time to read the seed packet. You’ll fine valuable information regarding planting depth, spacing and days to germination as well as days to maturity, once your transplants are in the ground.
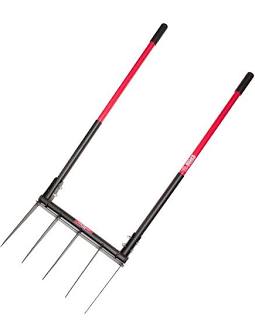
Gardening with a Broadfork by Dudley McBride
Several years ago I was turning the soil in my raised beds with a shovel and thought there had to be an easier way. Plus, Iwanted a tool that supported a no-till approach to soil management. After some research, I purchased a broadfork from Mountain Creature (https://meadowcreature.com). So what is a broadfork and why do some gardeners speak so favorably of its use in their gardens?
A broadfork is like a tall pitchfork EXCEPT it has two long handles – one on each side of a 1-2 ft. metal crossbar from which several long tines extend down towards the ground. When the gardener steps on the broadfork’s crossbar with her full weight while holding the overhead handles, and then steps backwards pulling the handles towards herself and then forward again, the forks loosen the soil, but don’t turn over the soil. Thereby, the layers of soil are left intact yet aerated, inviting air & water. The broadfork seems to have been invented by Andre Grelinin in the 1960’s. It was known as a grenlinette in France and was introduced into the United States in the early 1990’s by Eliot Coleman, author of New Organic Grower and other works. Coleman has quite an extensive farming and advisory backgroundin the field of organic gardening.
Many gardeners like using the broadfork for various reasons. Forone, it’s easier than digging down with a shovel, lifting a load of dirt, and turning it over. Lifting that dirt seems to get heavier & heavier. In addition, when shoveling or even tilling soil, the dormant weeds under the surface are brought up to the top where they can germinate and flourish for another season. With the broadfork, the dormant weed seeds remain underneath. In addition, with a broadfork one can loosen the soil without destroying the soil structure and the living web of bacteria, fungi, and earthworms beneath the soil surface, which are good for healthy garden soil.
Broadforks come in a variety of dimensions and constructions. My broadfork is made of steel which makes it heavier than broadforks with wooden or fiberglass handles. Weight and handle length relation to the user’s size and strength should be taken into consideration when choosing a broadfork.